Showing posts with label Amigurumi. Show all posts

Wednesday, July 27, 2022

Free Amineko amigurumi pattern


This is a super quick and easy pattern, a beginner favorite and great for scrap burning. Children, as well as those who are kids at heart LOVE this guy....

This isn't my pattern - it's been around for a while, made freely available by a Japanese designer (you can find original design here ) . the orginal works has great diagrams and illustrations which was amazing when I first started to crochet, but over time I've modified some of the design and made it more printer friendly(click here for pattern).

For this project I used 9 skeins (23.9ft/7.3m each) of craft thread I've been hoarding. Initially I meant to make friendship bracelets with them but I soon found that was not possible. The threads are weak and tend to fray or rip as you tighten your knots and the beautiful gradation of colours were simply not done any justice. I've been hoarding a boxful of these even before I started  crocheting in 2014, and been saddened that they just collect dust.😢  Here we are though, finally found a project that showcases the colours beautifully <3 the hoarding was worth it!!!

As for the hook, I used a 2mm hook, but you can use a 1.5mm hook for a even tighter fit (particularly good if your tension tends to have slack). The kitty stands at about 7.5" tall from tip of ears to paw.

couple of things I changed:

  • the ears are shorter
  • snout is different 
  • i didn't use weighted filling . for this size, it didn't make any difference to have weight or not but for larger, it may be useful. I never have ,even for larger size.
  • used wires for limbs instead of stuffing - mostly cuz i am lazy but also, this made the limbs posable

hopefully you try it out and find it easy to follow!


Happy hookin,


Shyni


Sunday, February 25, 2018

Mini me

Once upon a time there was a girl named ...let's call her Karen  - who was happily married, had job of her dreams working with special needs children, lived in a beautiful country with lots of sun and no snow...had everything she wanted except a child. Despite doctors telling her that she couldn't conceive, she kept trying and when I met Karen during my visit to Costa Rica, she was starting to lose some faith although very hopeful still. Although we couldn't really converse (we both spoke very little of each other's respective language), the way she looked at children passing by pulled at my heartstrings, knowing that she may never have them (something I can relate to), no matter how much she wanted them.
On one of my last nights there Thumbellina happened to be on TV - none of us were watching it - it was just background noise. I had just started to get a hang of crochet and was working on JiJi the cat from Kiki's delivery service and others were playing cards or just talking. At one point though, we all ended up watching the movie and enjoying it's simple pleasures.

When I returned to Canada I happened to stumble on a baby crib crochet pattern and somehow that lead to Clare's Youtube channel for a little purse that flipped out to be a little crib!!My mind blew.   I had bought a pattern from a designer I just LOVE, of a baby even though I had NO IDEA what I would ever do with it. When I saw the crib, I thought " wouldn't it be nice to make Karen a little thumbellina?" So I set out to work.

This purse crib thing, is a super easy and flexible design and could be made to fit any size doll. You can get the written pattern here but i really do recommend watching the video tutorials where you can hear her logic behind the design and how you can create it to match any doll.
Her channel and website is a gold mine for some amazing projects - bright, happy and  easy projects you can whip out in no time - so be sure to check it out.

Anyway.
when I made this, I had NO idea how to put on hair or face so I left it blank...and now I don't think I will add a face it is just so cute without it~
I used Redheart supersaver and a 5mm hook for the crib and some random blue shimmery dk weight yarn and a3.5mm hook for the baby.  The baby pattern was a little challenging to follow and the designer wasn't all that responsive (I'm sure she's hardly checking since her Etsy is dominantly patterns generating income) but I made him finally and he is SO CUTE!

what is almost amazing is, shortly after I sent her this set she became pregnant and had a beautiful boy! although we aren't really in touch any more, I also heard she's expecting a 2nd child... so don't let those doctors kill your dreams..:)

I also made another baby in purple - just to make sure that I understand the pattern XD
I did change the hat to be more of elf hat than a bear hat and I made the moon and clouds....the blurry red thing there is a dangly heart that I can never seem to catch standing still. Initially, this idea was going to be my logo - but I changed my mind lol. Just in case you are wondering, the doll is made with 3 mm hook  and measures about 5'... it sits in the palm of your hand *sqeeee*

 I have yet to find a moon pattern  size - what I did was follow a pattern for a horn and then reverse it. you could probably make 2 horns and attach it. There are TONS of cloud patterns out there though , just pick one that"speaks to you ...:)

That's it today! I hope this inspires you to check out Clare's Youtube channel  - Bobwilson123 for some excellent reasons to buy more yarn :D and try this adorable crib !!!

Monday, December 25, 2017

Blushin' Hippie


OKAY.
I FINALLY DID IT.
I MADE MY FIRST BUTTON JOINED DOLL.

This doll is product of many trials...  I want to almost call it my test baby.
I tried crocheting eyes as small as I can (which wasn't that small, her eyes are about 1.5" in diameter)tried different stuffing, and tried to join the limbs...all turned into a great success , I love the way she turned out.
She has a pretty blush, GORGEOUS eyes and a doily heart on her butt (I had made this as part of another project- then lost it and it suddenly reappeared to belong to her behind).

Initially this project started with a box of yarn a friend sent (that she's been hoarding hoping one day she will magically become a great knitter/ crocheter and cover her space with hippo things and purple) along with a Happopotus pattern by Heidi bears. I made a giant hippo (footrest size really) and still had enough yarn to make a Max the dog by Heidi among other things and this little bashful gal...and there are still much yarn left, I need to make another Heidi hippo or something, this is hindering my shopping tendencies lol.

I am HORRID at coming up with names so she will just be Blushin' Hippie for now....this pattern is a simple mod from Heart & Sew's Happy Hippo which looks like the little standing one to the left. IT is adorable just as it is and the pattern is SO EASY  to follow ! the only tip I would say is to print out the darn thing, it will make life so much easier.

This is a BIG doll; she stands about 18" tall using a 3.5mm hook - she's absolutely cuddlable and reminds me of holding a baby she's just that size and build.

Super fun to make and super easy to follow instructions  with lots of details and notes on how to make your baby perfect.... I recommend making 2 if this is a gift, because you may NOT want to part with it once you're done ( I could not LOL).

that's all today! happy hookin'!

Wednesday, December 20, 2017

my top 3 crochet hacks/tips

2017 is ending on a really exciting note for me! I discovered places to market and sell my little creations that is slowly invading my tiny apt (so I can make more stuff to fill my tiny apt with lol) and I held a workshop to share my passion with others. I made some amazing custom orders I didn't really think I could pull off and made some progress in being a regular checker of my Etsy shop instead of ignoring its existence (or just forgetting).

During the workshops I held and whenever I teach people crochet there is just never enough time to share some easy hacks , the excitement of learning new craft AND dis-spell myths of needing expensive tools to be able create great things; they are certainly nice to have and in cases of art, it CAN enhance the final outcome but isn't a requirement to create great pieces.

Today I want share with you my absolute fave tips that cost me nothing but made quite an impact in my hookin' life - I practice creating without breaking the bank (it’s more enjoyable that way too!) which is why I also created the Amigurumi starter kit in my shop - it's probably the only things you will need for at least first 2 years of this hobby (I still use the same stuff).

I started to include the materials required for these hacks in my kits as well, so that you have everything you need to make your journey more enjoyable.

So first thing is the binder clip hack.
These little guys are so awesome in keeping your yarn in check, and from tangling if you end up

using multiple colours.
All you have to do is get a bowl – glass works best as it has enough weight to stay still – and clip it on. Thread the yarn through the metallic parts and voila! It will keep your yarn untangled and the ball of yarn from running around , falling off and irritating the cat and you. If you FORGET to thread it before you start, not to worry; the metal holder comes out when you squeeze the wider side and you can always thread the yarn through.

I find this hack to be much better than a yarn bowl as the size of my yarn ball CAN change whereas the yarn bowl size cannot. Also  I just don’t carry my yarn bowl around but there is always a plastic container or cup available to clip to.

I also like to use the Lysol or Purrell wipe containers for larger spools of yarn or multiple little balls of yarn. Just cut out the circle where the wipes come out and voila!  You can get really creative with this and it will save you so much hassle and even some money.

The next hack is for the hook itself.
This is an important hack – your hands will tire and cramp up as you crochet like a madman…. Your hand will be stressed trying to keep up with your excitement and also because hooks are just not designed ergonomically. There are many ergonomic hooks available out there that you can purchase but it IS an investment that you may not be willing to make ,as they can be pretty pricy.

I have personally lived off this hack for the longest time before wrapping my hook with some clay  – and though I now own a couple of ergonomic hooks( you can read my thoughts on it here ), I still use my clay covered ones most (you can read about how to make it here ).
All you do is, wrap the elastic band at the center of the hook a  couple of times (where the size is indicated). Write down the size somewhere because you will need to know it to put on the pencil grip. The point of the elastic grip is to provide support/grip so that the pencil grip stays in place; the whole elastic doesn’t need to be used but it does need to be as flat and tight as possible.
Slide the pencil grip to the center of the hook and write down the size of the hook on the grip with a black pen/sharpie.
That’s it! This little trick will pride you with a comfortable grip for much longer period of time and let you enjoy your craft in comfort.

Lastly hand exercises!
This is important to be able to enjoy your hobby for a long time to come and for general hand health – we use and abuse our hands all the time, we should reward them :D
This is my fave exercise set I try to do after every crochet session. It is from We are Knitters and says it’s for knitters but crochet’s like a cousin of knitting so I think it’s still applicable.  XD


And that’s all!
I hope this was helpful and happy hookin’!

Friday, July 7, 2017

elephant pattern round up!


what is BIG , gray and a little clumsy but comes with trunkful of good wishes? AN elephant!
Many eastern cultures believe them to possess wisdom and to bring the owner good fortune and they are possibly one of the most loyal animals - I have been moved many times watching videos of elephants journey to pay respects to a human that had shown kindness to them. Not only that, baby elephants are STUPID cute.

Anyway, among many of the patterns available out there in the greater Internet, I found these to be the cutest and easiest.

The 3 larger elephants - in the tower of elephants - are all one pattern made with different sized hooks. From the bottom we have the gray elephant made with 3.5mm hook, than a 3mm hook and then a 2.5mm hook. This is pattern made available by Stephanie from All About Ami which you can get here .

The itty bitty tiny elephant up at the top... is by Canal Crochet and you can get it here ; she even has a video tutorial available, which I found to be helpful. I honestly wish I'd watched the video first, so I can understand how this is all put together because just off the written pattern, I was well confused - its not  HOW it was supposed to look in my mind - but that's just me.

Dsc_5990_1_small2The last dark gray elephant - I LOVE this color for elephants because I feel like they are dark gray - is by Amour Fou which you can get here. I unfortunately ran out of the charcoal gray yarn so my Gustav is without ears :( but still ridiculously cute without them) . I added a stand at the bottom of the ball so that the whole thing takes up less space (because my apt is running out of room), and can stand on its own. It's really just a circle cut out from cardboard, secured with wires to the ball and works great.

The last one - this one is was made by a friend of mine - that I never tried, mostly because it was too big to sit on my tower of elephants and I ran out of gray yarn for the time being . When I get more (that is, when I have space to store more) I would definitely make this little guy. This one is a free download from Ravelry here.

That is all I have today! I hope you try one of these and happy hookin'!


Saturday, June 10, 2017

Freebie pattern: JiJi the cat from Kiki's Delivery Service

WELL.
It has been a long time, almost a year since I wrote down anything....you'd think I planned it this way, the date of last post is pretty close to this one lol.
Anyway.
Life was a crazy roller coaster ride for last few months; it was certainly emotional, and had I enough wit,I would have remembered to rant here, but I didn't. The good thing is the learning curve was pretty steep and I had to take actions (some drastic) to try to improve the sticky situation I was in , and to relieve some stress I was making a LOT of things. I also watched a LOT of movies and TV shows I meant to but didn't have time for until now; in some ways, my life hit rock bottom, just so I can catch up with the things I loved .

So THIS movie, is probably considered a CLASSIC Ghibli studio movie - I love the character design but until this past week I did NOT see this movie (which bought the shock of my fellow animation fan who immediately disqualified me as a Ghibli fan or animation fan for that matter LMAO).

And though she was kidding, I realized I didn't watch a lot of classsic animation, so I'm going to be watching them in the upcoming days, at least from Studio Ghibli, whom I keep confessing my love for.  I actually watched a couple more of older Ghibli studio movie, "Whispers of the heart and When Marnie was There. I loved how accurately Whispers of the Heart captured daily life in Japan eons ago - the focus was on capturing time instead of fantasized characters we have these days. The second movie was very heavy and sad and I cried. Then, even though the ending left me completely hanging and unsatisfied , I went back to watch Kiki's Delivery service for the second time , in case I missed the ending somehow ( I didn't apparently). After, because I am crazy and was dead in love with the little black cat Jiji, I watched it the 3rd time while making this doll. Jiji is full of personality - sarcastic ,playful and bashful - a lot like my own little black cat, and it totally make me wish that my cat could talk to me!

I will say this turned out much better than I expected considering this was made in the wee hours in the morning. I am still surprised that I didn't stab myself while needlefelting the ears and the eyes.

To make this little guy, I used worsted weight Redheart Supersaver yarn with a 3.5mm(E) sized hook. The little nose is some baby pink baby yarn I had laying around since I learned the different size of hooks. The pattern itself is pretty straight forward, although I was a LITTLE BIT confused when I made the body part because of the shape (which made sense after) and I skpped out on the paws because I thought it made it... unnecessarily bulky looking? I mean when I see my cat sit this way, especially in the dark, I can't tell where his paws are; I see his tail ,body, head and his giant ears....so that's my interpretation of it.

For this pattern in other languages, click the picture
 The amazing lady who designed Jiji The Cat pattern (probably Angie is her name) - you can get my downloaded copy from the link above or  visit her Ravelery site by clicking the photo below (that's her version of the cat) where she has the pattern available in multiple languages such as Russian, Spanish, French and Dutch.

Friday, February 5, 2016

Freebie Friday :Chinese New Year.

2016 is the Year of the Monkey- and apparently that is not a good thing for monkeys ....this would normally bug me, except I don't think I've had a "lucky" year in the recent times....but then I got a few "second opinions" about the future forecast that say that this is my Carpe Diem year...which is nicer to know (lie to me darling!) - just proving that these things should only be taken as entertainment and nothing else.  Anyhow I though it appropriate to post some free patterns to mark this occasion!
I love that these are quick and easy projects <3

group1 this first one is just toooo TOO cute!
It's been bookmarked in my stash forEVER and a half and one day I shall endeavor in making them!! It's the 12 signs of Chinese Zodiac...but with personalities!!! Apparently its based on a manga (which is, even better!) I've not heard of but I am thankful it exists and inspired a creative soul to make some sharable pattern! I really LOVE that they all have little expressions lol .


imageOf course I can't forgo a cute monkey pattern to honor the animal of the year!! For this I turn to the one who spews the cutest amigurumi patterns I have seen - Stephanie of All about Ami.

This Monkey Pattern is RIDICULOUS in its cutness scale.  I love the little tiny banana he's holding.... the curling tail and the wee little nose just kills me.  I could just eat him really!!!100% inspired to make one of my own, as soon as I am done with all the coloring pages I printed out LOL.


imageThis pattern of an adorable chinese girl is again from Stephanie from All about Ami, you can give any year. I think it compliments the above very well - you can make a smaller version of any of the animals to instead of the rabbit and personalize the gift!
I love the simplicity of this design and of course the cute factor is high. This one is by one of my favourite designers - she writes detailed patterns so you can't ever get lost - perfect for beginners like me lol.
IS THIS NOT THE CUTEST THING EVER!?!

I want to make at least a dozen to give away to parties but we shall see about that....hopefully I won't lol.

That's all this week! hope you like and keep on hookin'!
Love always,

Shines

Friday, January 15, 2016

Freebie Friday: Legend of Zelda - Link pattern

This week has been a busy week for hooking and arting...I started a 2nd Elsa topsy-turvy doll and embarked on making a Link doll from the Legend of Zelda series.... I haven't enough hand-eye coordination I don't think, to be good at games (I hold the record of not ever being able to finish the FIRST Supermario game by myself) although I enjoy watching others play and appreciate the artistic efforts and the stories told.
I actually did play the Ocarina of time version of this franchise...ONCE.   Years ago, I was on a very long road trip and was bored out of my mind because I had forgotten to bring games for the Gameboy, which I was hoping would entertain me for the 13 hour car ride. My friend was well prepared and had brought a few, and let me play and it was an interesting "fun" experience, filled with all sorts of frustration but it passed the time which was great.

Since I am NOT really a gamer I wasn't really sure if I can do this request any sort of justice - but I accepted the challenge anyway because surely my little brain can figure SOMETHING out based on all the things I've made so far!!!?

THANKFULLY I didn't have to use too much of my own brain as those more talented than myself have generously made patterns available muwahahahahaha.

how adorable is THIS!!!
My little buddy is based on the Link pattern Stephanie from All about Ami had posted.  The pattern is translated by Tanoshimou - but it is based on this pattern. Stephanie also made his shield and sword pattern available. Unfortuntely for me, the tunic style is not what my friend wanted, so I had to modify it as I go...and learned my limit (I had no idea what I was doing) and my poor little buddy was shirtless for a while. I also wasn't much fan of the hat either? I felt it was not as conical as it should be.
Either way I find this design too cute to not try to follow the pattern one day! it is certainly on my to-do list!

This woman is so talented - I love her itty bitty amigurumi patterns that just makes you want to squeal from cute over dose, but  also the clothing items that she creates also look so cozy ! One day when I am moved to do so, I will try to make some sort of garment lol.

Couple of days later, I found another amazing and generous person who made a pattern for the version of Link I needed!!! I would also like to take this moment to fess my love for the cleaver name this lady called her blog :Nerdigurumi. OMG. I LOVE IT SO MUCH !! I almost wish I had such a clever name to call my blog but, oh well. LOL Anyway.

This design is great because it features no only Link from Four Swords game but other little creatures from there! It's an ENTIRE SET. I almost think that its an easier design to follow? I may be the only one in the world who feels this way - but I feel like having a picture is only great if a step is particularly confusing. Maybe I'm just not a fan of phototutorials? or not enjoy scrolling after every row to see what's next? I dunno. Either way I found this pattern earier to work with. I like that all the photos are up top and the pattern are just the pattern not a mix of the two. ANYWAY.I'm going to stop being an ungrateful brat right here LOL.


I did end up making both dolls....one with the shield too, but I can't post the pictures until next week as its a surprise XD

That's all folks! hope you try it out! keep on Hookin'!!

Love always
Shines.

Friday, January 8, 2016

Freebie Friday: Elsa of Arendale

Who doesn't love Frozen? I loved the song even before I watched the movie (thank you , spoiler ex co-workers) and while I love all my animation movies this was probably one of best and possibly all time favourite. I love the ever optimistic and happy Anna but I felt that we can all relate to Elsa who goes through various stages of fear an uncertainty and ...shame of what you were born with. The journey to finding ourselves and to self love is a hard one, one most of us struggle with.


I found a pattern of Elsa unlike any other - it flip/transforms between the two Elsa. She called it "transformable Elsa" which is essentially a topsy-turvy doll.
The instructions are in Spanish and I found it to be a little bit difficult to understand at times but, not impossible to follow. I am going to see if I can clean it up so I can share it one day but don't quote me on that yet :) Head's up: its a lot more work than you think it may be.

The hair was the most challenging part for me but it worked out pretty darn well, and now that I've done it once, I will surely be able to face it again. It wasn't as tedious or hard as I thought it was going to be. In fact, dare I say I enjoyed making this doll?

As the doll was intended for a little girl, I didn't end up putting in the embroidery detail as instructions and the original doll had, but I will make one available on my Etsy soon with the completed details :)

This Elsa is SO CUTE.
perfect for a little girl... I want to make this doll one of these days possibly for a little girl :D I love the details of the facial features.
 I just don't know if I  can survive making something so large...and so much hair to stitch......O...ammm...geeee .... I do feel better better about attaching hair but I am not sure if I can deal with this much hair. Not to mention the embroidered eyes!!! omg what  will I do with that? how LONG will I procrastinate before I give this doll eyes?! (I still have a doll that is bald due to my "fear" of hair attachments). Having said that, I also like a challenge so it will probably remain in my bucket list lol.


Anyhow that is all for this weeek, hope you like and keep on hookin' :)
Love always,
Shines.

Friday, January 1, 2016

Freebie Friday:Hello Kitty

This past week I made Hello Kitty for a 2 year old girl.
Hello Kitty is infamous - I personally have never been a fan - I never really understood why it was so famous. It didn't seem all that cute to me and it was just too "girly" for me, lol. HONESTLY I don't know why it's not ever appealed to me.

Anyhow. I made one and it turned out pretty darn cute and it is a perfect size (it measures about 9.5") for a little girl to carry it around.
I seem to have a serious problem following instructions to a tee so I was pretty BENT on following this pattern to a tee. HOWEVER, I don't think I'm not meant to follow patterns because my friend wanted the kitty to wear its original yellow and blue out fit ....which is cute.

I really like the group of primary colors together - its so bright and cheery <3 Of course, the pattern I had on hand and meant to use was Ballerina Hello Kitty ... with the cutest tutu and ballet shoes and the frilly skirt which just swallowed me whole in it's cuteness. I was even going to make the legs separate, even though that's not really my thing. But since I was going to have to make modifications (I couldn't find a patter that fit the pictured - although google found me one now that I've improvised one) I decided to join the legs as well. I was reallllllllllllllly not sure about the embroidering of the facial features - that wasn't really really something I was used to. I drew the shape and tried it a few different times in different ways but the easiest way was the best way.

Either way, I'm pretty pleased with the way it turned out.!
That's all for the week - keep on hookin'

Love always,
Shines.

Friday, December 18, 2015

Freebie Friday: It`s starting feel like XMAS

Okay. The holidays are upon us. Let the panicking, running around like a headless chicken ensue. Thankfully (?!) I haven't any blood family to go insane with -and my chosen family tend to be fairly mellow and we celebrate after the chaos is done so I have time to make a little something for them.
Another set of really quick and cute patterns by talented and generous people online - a must try!

I have NO idea where some of the patterns came from - unfortunately - so I can't give credit to them. I had saved them and now I don't know where they came from. If you know where they came from , please let me know.
Santa ornament - this is so cute. you can turn him into a little chocolate (Ferrero Roche) cover or stuff'em to turn him into an ornament. I really like the loop stitch deal, it really adds to the cute factor!
Santa hat - perfect for all your amigurumi dolls to get in the holiday spirit
Gingerbread man - well. he's alays appropriate lol
Xmas tree 1 - what will we do without the tree?
Xmas tree 2 - just another version
fancy xmas tree - this uses my new favourite, scale/scallop stitch. Its a project of love.
Rudolph - this guy is so cute.
teddy ornaments - by the infamous Stephanie from All about Ami . these are so perfect for gifts. She has so many adorable patterns available online.

I'm still debating on what to post next week :S new years stuff or winter animals... :S oh well, stay tuned I guess ;) Keep on Hookin' till next time!

Love Always,
Shines.

Saturday, December 12, 2015

Freebie Friday: snowman season

Well I didn't forget about the post... I even wrote half of it but the drama from my life is continuing on and I had some "emergency" orders to fulfill - which caused a bit of delay BUT! here it is now :D

This month is a super busy holiday month - and I actually thought it would be fun to share some Xmas related crochet patterns :) Most of the patterns will be ornamental but I will try to find some dolls to share along the way.  I just really love making little ornament pieces to add to tags of gift bags - to me, they are the PERFECT personalized, final touch every gift to your loved one needs :)

This week , we had our first "real snowfall" - where it felt like the holidays. We actually had snow fall sometime in October (can you believe that!? OCTOBER!!! but then it rained until today) but it didn't feel like snow. I really LOVE snow - its white and pretty and fluffy and you can make things with it. I am just not a fan of the cold it brings along - I wish we can have sunshine warmth and the snow at the same time but you know, can't have everything can we? lol

Anyway, in the spirit of the first snow fall which brings possibilities of snow angels and snowman making - I thought I'd share a few snow people patterns today. I have made some of these... and they make GREAT finishing touches to gifts that they can hang on the tree. Some I haven't - but I plan to:) These are quick , easy and super cute to make!

By Repeat Crafter Me
This is a cute pattern by Repeat Crafter Me.  He is probably my FAVORITE snow buddy to attach to gif tbags.


 This fella is a great little gift I think particularly appropriate for secret Santa sort of thing , or  for a little child. You can download the pdf of this pattern here


Teeny Tiny snowmen


Mini Snow men
This colorful for Teeny Tiny  pattern is probably one I use most...it uses up all my scrap yarn.

I would also say the same for the Mini snowmen pattern by `Dapper toad`( I love this name, its sooo funny to me and classy lol).


I did have some pre-made ones available on my little Etsy shop for purchase but they have all gone to a better home, of course if you want some made you can always get in touch with me via email and I will whip something up for you.

Next week - I`ll share some of the Santas and Xmas tree patterns to mark the holiday season :D
That`s all for the day :) keep hookin` , till next time!

Love always,
Shines

Friday, December 4, 2015

freebie Friday : Baymaxed

I feel pretty unqualified to profess any kinda love towards this character as I have not seen the movie. NO, I HAVEN'T. Which is particularly bad in my case because I absolutely ADORE animation films... but its been a while since I made my way into the theatre or back to the tele. Having said that I love the design of this character (round and fluffy is awesome) , and the trailers and bits I've seen I absolutely loved.

The first one I made - I have NO idea where I got the pattern from - and I guess I didn't think to bookmark it - but I almost think I tried to modify pattern by Krawa - I didn't like the gray details or the way he was sitting - although now, I think it so cute and  I do want to try the original pattern LOL.
I wanted it to have a little heart and point at the person as if to say , " I heart you" (yes super cheese I I know). I feel like the arms are ridiculously too long but I am super happy about the thumb turning out the way it did. It is going to make a great bag chain <3


 I had saved the larger Baymax by Nerdy Knots to make AFTER I watched the movie but, ended up making him for an order. I wasn't really sure I would like it at all but there really is something so nice and comforting about a doll with a plushy, squeezable tummy <3

I had to THINK a little bit as I made this one because I wanted one with joined legs vs. pieced legs as in the pattern.  I THINK it turned out OK but I am convinced that once I WATCH the movie, I will like it much much more. I totally made the fingers then decided to not attach them...and I am not sure if I like it better this way, but the fingers seemed so necessary to me( then again, I haven't seen one close up that had fingers so I'm not qualified to judge)?

I wasn't really sure what sort of pose to give this fella - I'm not a big fan of making dolls that have its arms at the side because well, that's really not natural at all~!
I was trying to figure out what pose to put him in and it finally hit me like a good cup of coffee or Advil - it was a Monday when I made him and well, maybe he'll be a Monday Baymax that is always ready to give you a giant hug whenever you need it? lol I like this thought and posed him as such.

Anyway that is all for today folks, 'till next time.

Love always,
Shines.

Friday, November 13, 2015

Freebie Friday : Crochet apples and cherries

Back in Novemember 2014 I saw a cute crochet ghost ornament that grabbed all my heart strings and pulled it. It looked easy enough and my ego as a crafty gal was sky high having "successfully" made a cushion (it was supposed to be a cat cave really, but they didn't grasp that concept well). I was soon pressed to admit I had no idea what was going on when it came to amigurumi and humbly chose something super easy to make first - Cherries. Well, that wasn't my intention actually - I was looking for HOW to start crocheting and this cherry caught my eye on Youtube as it was one of thes shortest videos and I wasn't really into making FLAT appliques.

 I made A LOT of cute cherries that day (10) and I was starting to get comfortable with how crocheting worked. It was super easy to make and so ADORABLE.  The practical side of me said, "what will you do with this? will it just be a dust collector?" and I felt instantly bad even though it made me so happy to look at these little cherries. Then, just like a sign from up above this little meme came into my life and made it all better !!!
Yes, happiness IS useful - in fact, most useful thing ever.
So after I conquered cherries, I decided to try something BIGGER....an APPLE.
I don't have this apple I made anymore - I made this apple with a friend and her sister napped it before I can take a picture to show it.  Its another super duper easy project - and absolutely adorable. Unfortunately though, I didn't write down where I got them from in the tip-in pages of my agenda so I couldn't give credit to one this pattern came from. I used a 3mm hook (size E i think?) and light weight yarn I think - this yarn had lost its label so I bought it , which is why I couldn't say but its similar to my other lightweight yarns. it makes for a cute key chain! you can click HERE for pdf version for download, if you prefer.

3D apple key chain

·         lightweight yarn of your choice for apple
·         light weight yarn for leaf
·         2.5 or 3mm hook
·         key chain parts

Stiches used:
Sc = single crochet
dec = decrease
mc = magic circle 

Notes: when it says 2sc this means 2 sc in the same stitch, when the number comes AFTER, it means the amount of crochet in consecutive stiches. For example, sc2 means sc in each of the next two stitches.

rnd 1:                 mc 6st                                         (6)
Rnd2:                 inc around                                (12)
Rnd 3:                sc , inc around                         (18)
Rnd 4:                sc 2, inc around                      (24)
Rnd 5:                sc around                                  (24)
Rnd 6:                sc 3, inc around                      (30)
Rnd 7 -8:           sc around                                  (30)
Rnd 9:                sc 4, inc around                      (36)
Rnd 10 - 12:     sc around                                  (36)
Rnd 13:             sc 5, inc around                      (42)
Rnd 14:             sc around                                  (42)
Rnd 15:             sc 4 , dec around                      (36)
Rnd 16:             sc 3, dec around                      (30)
Rnd 17:             sc 2, dec around                      (24)
Rnd 18:             sc, dec around                        (18)
Rnd 19:             dec around                               (12)
F/O
Pull the yarn from the top to the bottom centre to make indent to give apple a shape, secure it with a few knots and  trim.

Leaf:
1: chain 5, sc into 2nd stich from the hook
2: hdc, dc,hdc 2
3: stem - ch2 , hdc 2
4: dc, hdc, sc
f/o and attach to apple.


OPTIONAL: attach key rings at the tip of the stem.

There once was a Youtube video on making an apple - I think that's where this came from - but I can't seem to find it now :( I hope the pattern is easy to understand and hope you enjoy!! This would be my first attempt at writing a pattern so let me know if I'm missing anything :S Of course,  feel free to share this pattern and what you made via my other social networks on FB or, instagram at shyni_moonlightings.

till next time!!!

Love always,
Shines

Tuesday, August 25, 2015

Narrowing it down, down... down to...3 things? 4 things??

My life is a whirlwind...I had written a draft update months ago and it has yet made it to public...and since then so many things has changed but I shall divide topics accordingly and keep y'all updated :)

This year my goal was try to find some solid answers to many questions, in particular what do I enjoy doing - for work and for fun. I've always done what I had to workwise and not much thought was put into it. In the recent days, I've been able to find some answers and hopefully I'll be able to share that in the future.

Creatively - this was an easier answer in someways as I can try out whatever I wanted without reservation, providing that $$ was there to fund the curiosity...but then I ended up with many MANY  interests and nooo room left in my tiny apt OR time to pursue any of them with any degree of seriousness.
Recently I have managed to narrow it down to a few - which is STILL a lot more than I want but better than endless list of things I like. I would have to send a GIANT THANK YOU  to the people of Youtube who shared their passion on line and inspired my juices to flow, organize itself and finally, come into focus....as bookbinding. I don't know if that's what IT IS really but let's call it that for now.

I love books - or maybe its paper? I had kept a journal since I was a little girl and had mountains of books that kept me company when the world forgot my existence. I've kept a large library of books for a long time but I was soon running out of space - books, journals, coloring books  - they took up more space than I did,  and was a source of pain when moving. I traded most of my collection for a digital version of them.  One thing I couldn't trade was the heap of pages from magazines, packaging and other "junk" that I'd kept because I LIKED something about it. This collection also included mountains of  the one-sided printed pages from work that I had diligently brought home because, recycling system was questionable at work and I KNEW something could be done with it. This pile grew into exponential proportions and soon took over my shelf.

After much ponder I invested in a Cinch to alleviate this issue; at least, with the one-side print outs. I made piles of  scratch-notebooks and  gave one to everyone who helped create the pile of pages at work (they loved it, thank goodness). I also use it for brain dumping and writing notes, lists etc. which seems to have a therapeutic effect to my life.

Sometime in 2013 I bumped into the super inspiring Jenniebellie who helped me justify my hoarding of the other "junk" but I didn't think much of it because I didn't really have that many greeting cards and I was certainly NOT going to buy more STUFF to add to the pile! somewhere along the line I discovered how to bind your own books - I made a few signatures from piles of Copic catalogs and started to try my hand in art journaling after being inspired by Vicky...and I found that I really enjoyed making journals!!

This grew into a full blow out project and I started to dig into my stashes of paper to make my own little books for journaling (I was going to be set for the rest of my life in journal supplies! -well at least I thought I was) and helped me reduce my bookshelf full of paper to manageable 3 little boxes of papers.  As the journals I've made have also found new homes, I don't even have any on the shelf, which is even BETTER!  This year, I discovered the planner community and the Documented Life Project, where I learned even MORE ways to use journals(which meant I could just keep making'em!!) and keep a memory of my life somehow and not feel as if time was simply wasted.
So ...I guess planners? books? bookbinding? I dunno that whole BOOK area is awesome.
Here is a little video flip of Book of 2014 holding all the "creative" things  I made in 2014:

I even made a travel journal for my FIRST out of country vacay this year to Costa Rica:
...wow.... I sound really weird on video - sorry about the shakiness and bad lighting :( they're my first few videos, I'll get better  XD

The second great love came about in Nov 2014 when I discovered crochet. My friend lent a helping hand in reading the pattern and then I WAS DONE. I was crocheting little amigurumi from dawn to dusk for friends and I could not wait to get my hands on more colorful yarn. I even sold some which was GREAT help in getting my hands on some more yarn  and continue this obsession LOL.

Anyway, I think that is about it in terms of crafting update. Its so nice to finally be able to answer the question "what sort of crafts do you do" with a paragraph long answer vs. an essay answer :D hopefully I can get that narrowed down even further but we'll see.

Take care,
Love Always,
Shines.


Monday, March 9, 2015

HELLOOOO 2015

OKAY.
So clearly I fell off the blogging bandwagon once again (it seems to be an annual event at this point) except this time, I don't feel so bad because this time it wasn't life that caught up to me and drove me up the wall (although that's still ongoing) but it was creative adventures. At last, the year started on a creative note.
The many adventures I've been involved in include the world of Documented Life Project, Amigurumi, scrap bookbinding and return to coloring; soon, I am going to explore the world of need felting. Everything I have been interested in but "never had time for" - This year is the year I will try them out ! So far, the journey has been more than fulfilling and supremely addictive.  Here is a "brief" summary of how I got to this beautiful mess.

ONCE, when I was 8 my mama (also a DIY fanatic) introduced me to the calm world of knitting. I made a scarf and that was the end of that. I make scarves annually because I just can't find scarf I like enough to buy (super picky) and knitting truly is a slow and calming activity. Unfortunately, knitting wasn't my calling. I enjoyed things that are...less functional, cute and pretty things really... which made me feel bad...then I saw this meme which made it alll better; happiness and sense of accomplishment provides priceless intrinsic rewards!

ANYWAY.
I went to my first "Stitch & Bitch" session with a friend who LOVED knitting, hoping that it would kindle a spark. I was looking for a pattern to knit until I came across this cat cave crochet pattern which looked simple enough and I randomly had a crochet hook lying around.  Unfortunately at this time neither of my cats understood the concept of cat cave ,so it ended up being a cushion after days of trying to coaxed them to love the cave. They love the cushions though!

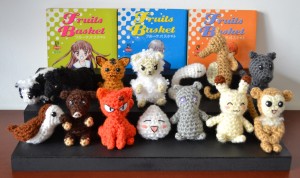
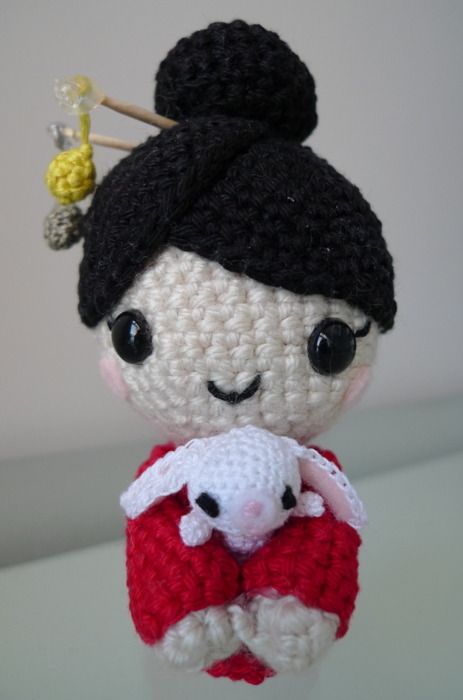
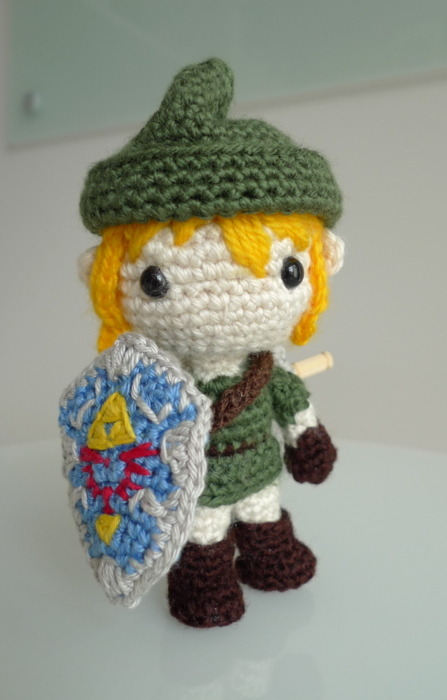
 This sent me whirling into the world of crochet, in particular, amigurumi (which means small handmade toy in Japanese, I think). There are tons of generous and talented souls out there that share the pattern they made. One of my favourites Stephanie of Amigurumei , who makes the easiest patterns for the cutest things! This thoughtful woman has even made a Patterns page on her blog for easy access.  This new hobby turned into an obsession really, and I was a serial hooker for a while there - eat, work, crochet was a daily thing until recently - now I sleep sometimes XD
You can see all the stuff I have made so far on my Amigurumi album on my FB page, if you're curious.

The bookbinding thing isn't new. I always enjoyed upcycling scrap paper. My entire art journal last year was made from upcycled Copic Market catalogs. I work at a place where printing is mandatory and scrap pages are available by the mountains. Being a hoard, I kept a lot of scraps but I simply couldn't use them up quick enough and my little apt was getting crammed up with all sorts of junk I had saved (Youtube is REALLY a great place if you want reasons to start hoarding).  After much hmming and haaaing, I bought myself a Cinch bookbinding tool - which turned out the be an excellent investment.  Instead of spending hours hand-stitching and gluing , which left little energy and motivation to actually do the fun bits like decorating, I spent minutes binding the book and hours playing and altering cardboard covers. So far I have made and given away 4 books which are all being used on daily basis. Having less in my hoarder box is good; knowing that the books are appreciated, loved and used daily is awesome; feeling that art/crafting didn't create more garbage is AMAZING. I don't get to make them often (because they're super fat books and takes a while to use them) but I certainly have a whole pile of 'em made for the next person who wants one. You can see what it looks like here.

The Documented Life Project is something I discovered last year. I fell in love with the idea of Documented Life Project 2015 page.
having a sketbook/planner/journal all in one place (deep inside, I am a minimalist. or multifunctionalist- I like things that can serve more than one purpose). In fact, my planner was already a mix of 3 but this gave it structure that it needed. I was bent on taking part this year and although the idea has migrated to more of Art Journaling, I am having a great time playing along. It really forces you to be creative and to play, at least once a week. This project has put my art journalling to a pause but I feel like it will only enhance my love for art journals.  So far, with the exception of ONE challenge (which I will fulfill soon when I have some under paper made) I have been following along. What is most exciting is that I can already SEE myself breaking out in baby steps from the way I have been journaling and actually having FUN.  In a strange way, the weekly challenges really aligned to the experiences I was going through during the week , which makes this even more remarkable journey to embark on! To see the pages of the week you can check out my

At around the same time, I had  become super interested in Wreck This Journal project - which from day 1 proved that I was not as "free flowing" as I was hoping I was. Unfortunate this project will have to hold for a bit as I've piled a ton on my plate already. LOL

Lastly, I have returned to coloring.
I can draw - and I enjoy being able to draw; but, I have always loved coloring and if I could, I would sweet piece of work for Valentines day. I printed it, stuck it on my planner and colored it using my trusty Crayola markers. TOO FUN.   Of COURSE I had to go and buy one of those books I've been pondering on. I debated but in the end the Secret Garden is what I chose - mostly because there are pages filled with doodly flowers I just can't do without. So far, I'm working on a nice little fishy page - I'm getting lost in the details but I LOVE IT.
make a living from it. Its another meditative therapy (apparently I need a lot of therapy these days) that I couldn't get a start on for whatever reason (mostly because I was busy crocheting).  Then, the amazing Johanna Basford who inked "Secret Garden" and "Enchanted Forest" for the kid in us, released this
I forgot how awesome it was to  PAINT SOMETHING.
This book is going to last me YEARS at the rate I'm coloring them which makes it SO WORTH IT! It also put all other coloring projects on hold but OOOH well, it's not going anywhere anyways. lol