Monday, December 25, 2017

Blushin' Hippie


OKAY.
I FINALLY DID IT.
I MADE MY FIRST BUTTON JOINED DOLL.

This doll is product of many trials...  I want to almost call it my test baby.
I tried crocheting eyes as small as I can (which wasn't that small, her eyes are about 1.5" in diameter)tried different stuffing, and tried to join the limbs...all turned into a great success , I love the way she turned out.
She has a pretty blush, GORGEOUS eyes and a doily heart on her butt (I had made this as part of another project- then lost it and it suddenly reappeared to belong to her behind).

Initially this project started with a box of yarn a friend sent (that she's been hoarding hoping one day she will magically become a great knitter/ crocheter and cover her space with hippo things and purple) along with a Happopotus pattern by Heidi bears. I made a giant hippo (footrest size really) and still had enough yarn to make a Max the dog by Heidi among other things and this little bashful gal...and there are still much yarn left, I need to make another Heidi hippo or something, this is hindering my shopping tendencies lol.

I am HORRID at coming up with names so she will just be Blushin' Hippie for now....this pattern is a simple mod from Heart & Sew's Happy Hippo which looks like the little standing one to the left. IT is adorable just as it is and the pattern is SO EASY  to follow ! the only tip I would say is to print out the darn thing, it will make life so much easier.

This is a BIG doll; she stands about 18" tall using a 3.5mm hook - she's absolutely cuddlable and reminds me of holding a baby she's just that size and build.

Super fun to make and super easy to follow instructions  with lots of details and notes on how to make your baby perfect.... I recommend making 2 if this is a gift, because you may NOT want to part with it once you're done ( I could not LOL).

that's all today! happy hookin'!

Wednesday, December 20, 2017

my top 3 crochet hacks/tips

2017 is ending on a really exciting note for me! I discovered places to market and sell my little creations that is slowly invading my tiny apt (so I can make more stuff to fill my tiny apt with lol) and I held a workshop to share my passion with others. I made some amazing custom orders I didn't really think I could pull off and made some progress in being a regular checker of my Etsy shop instead of ignoring its existence (or just forgetting).

During the workshops I held and whenever I teach people crochet there is just never enough time to share some easy hacks , the excitement of learning new craft AND dis-spell myths of needing expensive tools to be able create great things; they are certainly nice to have and in cases of art, it CAN enhance the final outcome but isn't a requirement to create great pieces.

Today I want share with you my absolute fave tips that cost me nothing but made quite an impact in my hookin' life - I practice creating without breaking the bank (it’s more enjoyable that way too!) which is why I also created the Amigurumi starter kit in my shop - it's probably the only things you will need for at least first 2 years of this hobby (I still use the same stuff).

I started to include the materials required for these hacks in my kits as well, so that you have everything you need to make your journey more enjoyable.

So first thing is the binder clip hack.
These little guys are so awesome in keeping your yarn in check, and from tangling if you end up

using multiple colours.
All you have to do is get a bowl – glass works best as it has enough weight to stay still – and clip it on. Thread the yarn through the metallic parts and voila! It will keep your yarn untangled and the ball of yarn from running around , falling off and irritating the cat and you. If you FORGET to thread it before you start, not to worry; the metal holder comes out when you squeeze the wider side and you can always thread the yarn through.

I find this hack to be much better than a yarn bowl as the size of my yarn ball CAN change whereas the yarn bowl size cannot. Also  I just don’t carry my yarn bowl around but there is always a plastic container or cup available to clip to.

I also like to use the Lysol or Purrell wipe containers for larger spools of yarn or multiple little balls of yarn. Just cut out the circle where the wipes come out and voila!  You can get really creative with this and it will save you so much hassle and even some money.

The next hack is for the hook itself.
This is an important hack – your hands will tire and cramp up as you crochet like a madman…. Your hand will be stressed trying to keep up with your excitement and also because hooks are just not designed ergonomically. There are many ergonomic hooks available out there that you can purchase but it IS an investment that you may not be willing to make ,as they can be pretty pricy.

I have personally lived off this hack for the longest time before wrapping my hook with some clay  – and though I now own a couple of ergonomic hooks( you can read my thoughts on it here ), I still use my clay covered ones most (you can read about how to make it here ).
All you do is, wrap the elastic band at the center of the hook a  couple of times (where the size is indicated). Write down the size somewhere because you will need to know it to put on the pencil grip. The point of the elastic grip is to provide support/grip so that the pencil grip stays in place; the whole elastic doesn’t need to be used but it does need to be as flat and tight as possible.
Slide the pencil grip to the center of the hook and write down the size of the hook on the grip with a black pen/sharpie.
That’s it! This little trick will pride you with a comfortable grip for much longer period of time and let you enjoy your craft in comfort.

Lastly hand exercises!
This is important to be able to enjoy your hobby for a long time to come and for general hand health – we use and abuse our hands all the time, we should reward them :D
This is my fave exercise set I try to do after every crochet session. It is from We are Knitters and says it’s for knitters but crochet’s like a cousin of knitting so I think it’s still applicable.  XD


And that’s all!
I hope this was helpful and happy hookin’!

Friday, July 7, 2017

elephant pattern round up!


what is BIG , gray and a little clumsy but comes with trunkful of good wishes? AN elephant!
Many eastern cultures believe them to possess wisdom and to bring the owner good fortune and they are possibly one of the most loyal animals - I have been moved many times watching videos of elephants journey to pay respects to a human that had shown kindness to them. Not only that, baby elephants are STUPID cute.

Anyway, among many of the patterns available out there in the greater Internet, I found these to be the cutest and easiest.

The 3 larger elephants - in the tower of elephants - are all one pattern made with different sized hooks. From the bottom we have the gray elephant made with 3.5mm hook, than a 3mm hook and then a 2.5mm hook. This is pattern made available by Stephanie from All About Ami which you can get here .

The itty bitty tiny elephant up at the top... is by Canal Crochet and you can get it here ; she even has a video tutorial available, which I found to be helpful. I honestly wish I'd watched the video first, so I can understand how this is all put together because just off the written pattern, I was well confused - its not  HOW it was supposed to look in my mind - but that's just me.

Dsc_5990_1_small2The last dark gray elephant - I LOVE this color for elephants because I feel like they are dark gray - is by Amour Fou which you can get here. I unfortunately ran out of the charcoal gray yarn so my Gustav is without ears :( but still ridiculously cute without them) . I added a stand at the bottom of the ball so that the whole thing takes up less space (because my apt is running out of room), and can stand on its own. It's really just a circle cut out from cardboard, secured with wires to the ball and works great.

The last one - this one is was made by a friend of mine - that I never tried, mostly because it was too big to sit on my tower of elephants and I ran out of gray yarn for the time being . When I get more (that is, when I have space to store more) I would definitely make this little guy. This one is a free download from Ravelry here.

That is all I have today! I hope you try one of these and happy hookin'!


Saturday, June 10, 2017

Freebie pattern: JiJi the cat from Kiki's Delivery Service

WELL.
It has been a long time, almost a year since I wrote down anything....you'd think I planned it this way, the date of last post is pretty close to this one lol.
Anyway.
Life was a crazy roller coaster ride for last few months; it was certainly emotional, and had I enough wit,I would have remembered to rant here, but I didn't. The good thing is the learning curve was pretty steep and I had to take actions (some drastic) to try to improve the sticky situation I was in , and to relieve some stress I was making a LOT of things. I also watched a LOT of movies and TV shows I meant to but didn't have time for until now; in some ways, my life hit rock bottom, just so I can catch up with the things I loved .

So THIS movie, is probably considered a CLASSIC Ghibli studio movie - I love the character design but until this past week I did NOT see this movie (which bought the shock of my fellow animation fan who immediately disqualified me as a Ghibli fan or animation fan for that matter LMAO).

And though she was kidding, I realized I didn't watch a lot of classsic animation, so I'm going to be watching them in the upcoming days, at least from Studio Ghibli, whom I keep confessing my love for.  I actually watched a couple more of older Ghibli studio movie, "Whispers of the heart and When Marnie was There. I loved how accurately Whispers of the Heart captured daily life in Japan eons ago - the focus was on capturing time instead of fantasized characters we have these days. The second movie was very heavy and sad and I cried. Then, even though the ending left me completely hanging and unsatisfied , I went back to watch Kiki's Delivery service for the second time , in case I missed the ending somehow ( I didn't apparently). After, because I am crazy and was dead in love with the little black cat Jiji, I watched it the 3rd time while making this doll. Jiji is full of personality - sarcastic ,playful and bashful - a lot like my own little black cat, and it totally make me wish that my cat could talk to me!

I will say this turned out much better than I expected considering this was made in the wee hours in the morning. I am still surprised that I didn't stab myself while needlefelting the ears and the eyes.

To make this little guy, I used worsted weight Redheart Supersaver yarn with a 3.5mm(E) sized hook. The little nose is some baby pink baby yarn I had laying around since I learned the different size of hooks. The pattern itself is pretty straight forward, although I was a LITTLE BIT confused when I made the body part because of the shape (which made sense after) and I skpped out on the paws because I thought it made it... unnecessarily bulky looking? I mean when I see my cat sit this way, especially in the dark, I can't tell where his paws are; I see his tail ,body, head and his giant ears....so that's my interpretation of it.

For this pattern in other languages, click the picture
 The amazing lady who designed Jiji The Cat pattern (probably Angie is her name) - you can get my downloaded copy from the link above or  visit her Ravelery site by clicking the photo below (that's her version of the cat) where she has the pattern available in multiple languages such as Russian, Spanish, French and Dutch.

Monday, May 16, 2016

Crochet Hook review

Hi there!!!

Here is the product review post as promised :)
I usually try to stay away from reviewing products because it really is a personal thing, but I realize that sometimes when you're not 100% convinced, a positive review or two can give you the push you need to try the product - so here are my two cents - grab a bevy and sit down, this is a long one.

I want to touch on the different ways to hold a crochet hook.
I'm one of the odds that hold my hook in both knife/overhand and pencil grip style. When I am working with "larger" hook sizes (3.5mm and up) I tend to use the overhand but for smaller sizes I find it easier to work in pencil grip size.


Anatomy of crochet hook

Before diving into the actual review portion, I just wanna quickly share this awesome little picture from the greater Internet area that shows the anatomy of a crochet hook, just so we are on the same page in describing the  various parts of the hook . I didn't know there were so many parts ? but its certainly helpful to know, and makes me feel smart being able to refer to different parts by its proper name instead of the description of function (like "the part that actually hooks the yarn" is called a "bowl" - doesn't that sound so much better?!!!XD).

1. Boye Ergonomic Aluminum crochet hook handle

The homemade mod kept me happy for quite some time.
Then I started working on multiple projects at once - ones during transit to and from work and one at home....which was fine because I had acquired a second set of single ended hooks to complete the size set and to try out this baby. I saw this at Michael's and it piqued my curiosity - but I could not find any reviews on this product - the few I found were "OMG I am SO excited to try this, I will GET BACK TO YOU about how I like it" and there were no follow up. I guess  it was so amazing that they just could not find the time away from hooking to let us know how it was? I had to find out for myself.

This cost me $15CAD at Michael's, which I got a discount on because it was damaged and was the last in store.  It comes with round rubber heads that you slide onto your thumbrest of the hook before encasing it in the handle. The rubbers act as a stopper/stabilizer and prevents your hook from moving around. The handle fits PERFECTLY in the natural rounds of your hands and is super comfortable in the knife holding method. In fact, I made and entire doll in one sitting without pains after using this...it was REALLY comfortable.  And though I said it was designed for the knife holding, I've used it in pencil grip method and it was pretty comfortable too - you just end up going back to the knife holding method.
The cons of this product is that the plastic DOES NOT STAY SHUT. It's a twist-off top and came lose with use and about every 3 rounds or so I had to adjust and tighten. I made a Totoro doll using this which had 40+ rounds so that was kind of annoying.  Also, this was probably intended but this product will not fit all and any aluminum hooks - I am sure it will fit all the Boye brand hooks fine but only 2/5 of my aluminum hooks fit the rubber head.  The hook must be a standard 6" hook - any shorter, the tip won't hit the handle top which helps to hold the hook in place (again, not a problem, I assume, if you get their hooks). One other thing, I wish they included some sort of pouch thing to keep all the rubber heads together, and wrote the number corresponding to hook on the rubber itself and not just on the packaging. and had to search out  the sizing and the colors are so similar to each other that its hard to distinguish. So if you get this product, write the number of size on the rubber heads before chucking the packaging AND get a little baggie for them.

The top 4 contending hooks
I then got fancy and wanted to get some branded hooks - upgrade a bit - I had loaned out my hooks to a friend who wanted to try crocheting and why not upgrade? these 4 were the contenders. The top 4 narrowed to a top 3 because Hamanaka's selling point was it's double ended hooks and I already HAD a set I was darn happy with - perfect for travelling.

May I say I was pretty set on the Clover Amour set and its bright rainbow colours from the start. Then I watched a review on the Etimo who said it was better than the Amour set and the Addi swing looked like it would be great for both styles of holding and there were again, NO reviews -I had to try it. After much search I had to order these hooks online - I ordered 3.5mm of each hook from Amazon and gave it my honest shot.


1. Clover Amour set

This hook cost me $9 and arrived almost a week early which was a wonderful surprise.  Before I even bought the hook I was in love with the fact that each size is colour-coded and I needn't look for the size indicator anywhere - but in case you need to know, it is engraved - not etched - into the handle.
I like the lightness of this hook- its like holding a feather. The material - I guess the aluminum part - from the thumbrest and above, is a matted metal finish. It reminds me of  the way my aluminum hook was after it was baked in the oven? It looks and feels somewhat rougher but it actually is smoother and the yarn doesn't fall right off all the time which is helpful.  I just felt like the yarn caught better and the whole crocheting process was smoother.
THIS HANDLE is to die for. I just want to hold it forever.  It's not plastic so it has a little bit of a give , it's soft and matte finish is just hand-candy.  I didn't realize at first but, the thumb rest is a little bit chunkier than the rest of the handle(I guess that's an attempt at ergonomics), giving these hooks  an oblong-ish shape, which provides quite a bit of comfort - enough that you can use this hook comfortably in both methods of hooking - knife or pencil. Definitely a great buy totally worth the money.

2. Tulip Etimo

This little hook cost $17 and came in a fancy little box - and was "made in Japan" which created immediate excitement for no reason.  It looks very similar to the Amour hook but let me tell you looks are deceiving.


I wasn't really thrilled about the set only being available in PINK (not a fan of pink) or that the sizes are written on the side in tiny letters but that's just me.


The handle is not as soft - I don't know what the material is, but it' feels a little firmer to me. It's possible that it feels that way because there is so little padding on this handle and its MOSTLY the hook itself - minimal material used, although it feels heavier than the Amour hook. 
While it doesn't have the wider thumb rest, it is longer which is great if you're a knife hooker. The metal part above is a smooth shiny finish, which is nice also but the yarn did fall off the hook quite a bit.

This was apparently not due to the finishing applied to the metal parts. its because how hook is engineered !!!
The Tulip Etimo, has an in-line head which aligns the head with the shank, so if the bowl isn't deep enough to catch the yarn there is no back up to catch and or hold the yarn in place for you while you work. The Amour uses a tapered design , so the yarn is held in the bowl and sort of secured by a tapered neck. The bowl on the Etimo is also shallower than one on the Amor -  This is probably why I felt like the yarn was catching better.  

What I found MOST interesting about this hook was that it is ONLY few mm shorter than the Amour hook but that mm made a difference in comfort. The end of handle was literally digging into my palm while I crocheted because of this shortage - not causing any pain but discomfort and annoyance mostly.

I didn't expect it to be mind-blowing like the reviewer said (I think she blew it out of proportion because she had a shop and she wanted to sell more of the Etimo sets since the price difference was so significant) but I wasn't expecting to be displeased about it.
This hook wasn't all that impressive to me - perhaps because it was almost double the price and nothing was awe-inspiring about it. I felt rather like I paid for that fancy packaging and well to be honest, I rather buy 2 hooks than one with fancy packaging.  


3. Addi Swing by Setler

This giant hook came all the way from Germany. Cost me $20, lots of worries and was last to arrive. I was very excited about this hook because I'm a big fan of German innovation -and this looked like it was perfectly made for people who hold their hooks like a pencil.  
I don't know why I thought that because , in retrospect it looks much like Oral-B toothbrush handle and I don't hold that like a pencil at all...:(
It came colour-coded and and giant size labels - I was in love.

I spent over 5 minutes researching this hook - which is not a long time but it shouldn't have been that difficult. But when I was looking on Amazon, the listing would say "orange hook 3.5" and have a picture of a blue hook, or a red hook - it didn't match at all- so I had to search online to see what colors belong to what sizes. I wasn't going to spend money on a counterfeit (I may have though anyhow).  This was probably the red flag I should've seen and not ordered. Because I ordered this item, random images of this product was showing up on my internet and a lot of it was of BROKEN HOOKS. People took time to post about it on their social media and the company had not done anything about it. So I spent much time waiting and hoping that I got the right hook and that mine won't be a lemon that breaks. 
could they not afford to color within the lines?
It arrives and I like the packaging but I don't like the hook - this immediately made me wonder if I did indeed end up getting a couterfeit.  The picture are poor in quality so this may not show, but the coloring is not within the engraved area and is bleeding all over the place, as if some 10 year-old hand-painted this label here.  You're selling a crafting tool to crafters' who appreciate detail and someone thought this level of messiness was acceptable?? for a dollar store item maybe. 
ANYWAY.
The great thing about this hook is that the bowl is deep and the hook is tapered in design. Sad news is that the shank is slightly shorter - which made it a challenge to have more than 4 stitches - popcorn stitch was NOT A THING -- everything just fell right off - and ain't NOBODY got time for that, especially this chica with 50000000000 projects on her lists to make.
What is most disappointing was that what made me think- the handle design - would be great for pencil holders, was precisely why it wasn't. In fact,  the handle design is why I don't like this hook at all. In all honesty, this may just be me, but I have small hands. The curvature of the handle fits only a certain size hand comfortably ; I can crochet with this comfortably in one way for 10 minutes and then I have to adjust whereas my friend was able to crochet comfortably for 30 minutes. Her hands are bigger than mine though. The curvatures also limit the way you hold the hook - it is only for the knife holders, nobody else. I have used this hook ONCE to make a little head and that was all. I have tried few times after but why use this and be uncomfortable when I have others which are so much better? What a waste.

Overall, I like the Clover Amour hooks best. It's affordable,comfortable and pretty. While I may NOT buy the set (because I don't think I'll ever need a hook size larger than 5) I may get their metallic hook set with pretty pastels, they are definitely my choice of upgrade.
If you aren't looking to spend money on hooks yet (because you eventually will), the homemade alternatives from my previous post works awesome until you need a second or a third set to keep up with your multiple projects.

I hope this was helpful,
keep on Hookin'!!
Love always,
Shines.


Tuesday, May 10, 2016

Tools of the trade :DIY edition

HELLO:D

IT has been a WHILE! I am sorry to have gone away - but I am working on trying to figure out what to do with this hobby of mine and overall doing a revamp (or tidying up really) of my online space.  I'm down to art journaling and crocheting but just need to iron out the details... slowly but surely progress is being made and hopefully I can not only just share my plans but show you the changes I mean :) ANYWAY.

So I've been pondering about crochet hooks for a little while now but haven't yet found which hooks to commit to - and quite frankly I didn't know if I liked crocheting enough.  I now know that I like it a lot and am ready to commit to a brand of hooks (next week's post) - but if you don't yet know or don't want to - here are some simple modifications you can do with very little money to bring lots of comfort to your hands so you can keep hookin' it.

Before I go into how to mod your hooks, I  want to touch on the different ways to hold a crochet hook.
I'm one of the odds that hold my hook in both knife/overhand and pencil grip style. When I am working with "larger" hook sizes (3.5mm and up) I tend to use the overhand but for smaller sizes I find it easier to work in pencil grip size.  The way you hold your hook is pretty importantly because not all hooks are created to suit both styles of holds; in fact, majority of the ergonomic hooks out there are catered to the knife style of holding - which makes the homemade alternative also more appealing because it can cater to how YOU hold your hook. For example my yellow Sculpy handle is shaped that way because I find that shape to be comfortable for me in both styles of working.

Homemade crochet hook handles with elastic and pencil grip
My very first set of hooks came from a random dollar store that had "Needlecrafters" double-sided hooks for $5, in 2 different sets; so, I bought them both and I was a happy clam. until I saw Clover Amor set...then I started to really notice other hooks out there and wondered, are they really different? Are they really that much better? Because I was pretty DARN happy with my set. I had 4 hooks that covered sizes 2mm-4.5mm - it took up least amount of space and omgosh it was $10 in total! The thought passed and I was a happy clam again.
Then I got a little seriously hooked (bahahaha pun intended) and my wrists started to hurt , which lead me to homemade hook handles (which made me swoon) before stumbling on some alternative homemade solutions to making your hook a little more comfortable.

All you need is a thick elastic and a pencil grip which is available in packets at any corner store and dollar store for almost nothing.  For larger hooks, sizes 4.5mm and up you just slip on the pencil grip to where you want and that is THAT. writing the size on the grip helps and using different colors of grip for different sizes also help you keep organized (all my 4 hooks lol). For hooks smaller than 4.5mm, wrap the elastic a few times around the handle to thicken the handle before sliding the grip.  If you feel a little extra crafty/fancy , you can get a little block of polymer clay (like Fimo or Sculpy), roll it out to long snakes and wrap it around the hook and bake'em (which is what I did with the far right one).  The pencil grip solution is really quick and works well in all sizes of hooks and is foolproof - as you can see, my double ended hook is smaller than the regular aluminum set  but it will fit 2 grips and you can wrap clay around it no problem.   Once my obsession simmers (or I stop getting new project ideas) I do want to make some pretty handles for my hooks though.

 ONE NOTE : Polymer clay does come off with some prying of pliers but, it is rather difficult so make sure you like the shape of the handle before baking !!

Hope this is helpful :)
keep on hookin'
Love always,
Shines.

Saturday, March 19, 2016

Freebie Friday: Easter Egg patterns

OKAY.
So this comes a little delayed, but I had some issues (surprise!) with the pattern and the the egg shape that made the posting a little late - which is more of a legitimate excuse than the "OMLanta, life ran away with me!". The Chick in Egg pattern by Happy berry , which you see to you right - is super easy to do. She is a champion in making adorable and easy patterns. To make life even easier, she made a 2 part Youtube video to help everyone in need how to make this incredibly adorable chick in egg. For those who want a printable and somewhat shorter version of the pattern, I made one for myself that I can share - just let me know - because you can make this in ONE sitting at much quicker time than the length of the two videos I feel like.... any way, that's just the spaz in me talking.. back to the chick.

IS it NOT the cutest little THING?! my heart bursts a little every time, and I mean EVERY time I open this little egg and see my little chick.

This is where my OCD started to kick in LARGE. THE EGG isn't looking like an EGG. I mean it's not an oval like a real egg. Having said that, that's just the limits of the craft - it's housing the chick so it will be a bit flat at the bottom and the top will be a bit pointy looking but to me, it looks like tip of a pencil vs. an oval.  This is probably the difference between an experienced crocheter and a non, because Happy berry's egg looks like an egg. :) so don't worry, yours will not look like a coney container...even if its a super cute coney container.  Also, she uses a flower shaped button, which is UBER ADORABLE and even though I live in a city with a "fashion district" with stores that just sell buttons in all SORTS of fanciness you can get lost in them... I had some plain buttons in the tropical colors I loved and in the measurements she specified (which is important to follow), and as you can see it works nicely also. its SO CUTE<3


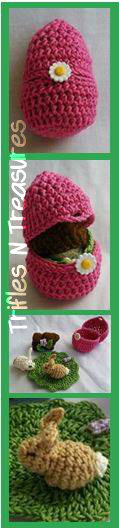
Picture Pattern number 2 : Bonny Bunny Surprise by Trifle Treasures 
I cannot tell you how long I have been waiting to try this out (well actually maybe only a year since I only started crocheting at end of 2014). just look at how cute this is!
I think I almost instantly fell in LOVE with it when I saw it, frowned because I wasn't sure I can do it and grit my teeth determined to make it one day.  That day finally came, but I was not a happy camper when it did.

This was one of those easy to follow instructions which is a jewel, when it comes to free patterns and not much needed to be edited for printable version either(let me know if you want one). I really liked that the whole egg was made in one piece including the button hole -not two pieces sewn together - and it fits in one of those plastic containers you can get in the dollarstore? so you can have it as a prize during egg hunt!!! anyway.

I got caught up in the egg shape of the container - so I used some fabric stiffer to try to copy the shape of the plastic egg, it didn't work. it actually curled a little in the center, which made it look like a mouth :( I ended up flipping the egg inside out which sort of resolved the cone shape issue for me a little but worsened the "mouth" looking issue? so I couldn't win with that :( so I gave up on that one there....-__-

The bunnies are super adorable though ! and I made two different sizes (mostly because I had two different weight of yarn ) but at 3am when I was trying to finish this and sort this egg shape business, I wanted to represent the Father and the Son somehow with my bunnies -___- and that is why they are two different sizes.

Then there is the LOG. that didn't fit. when I started making it, I felt like it was too big and might not fit but I figured since it was hollow maybe it could wrap around the bunny and squeeze in; it would fit AND give the egg the bulk it needed, smart right?  NO. The bunnies took up all the room in the egg, and there was no room for the log. Having said that though if I made another smaller bunny I think the log could fit....I'm not swapping though, I like this Father and Son symbolism I got going LOL. It's STILL adorable and if its used for an egg hunt, the kid that finds it will have tons more fun with different sizes of bunny vs. bunnies and log I think.


That's all for now, 
keep on Hookin',
Love Always,
Shines.